Since we felt we were a bit rusty playing Black Powder we thought we'd refight the battle again with the same forces, but this time check that they were balanced using the Albion Triumphant points system and add upgrades to balance them out.
In balancing the forces I moved the setting to late war to make things simple.
I was also keen to try out a scenario with the British defending a ridge line as they so famously did under Wellington.
The French were slightly disadvantaged as the forces were equal, and usually the attacker would have more. It turned out this was not a problem as I'm no Wellington.
Background
Somewhere in Spain in the late period of the war with Napoleon a French force attacks the defending polyglot forces of perfidious Albion. The French need to seize possession of the mountain valley to keep their supply lines safe. The Allies naturally need to secure the valley to cut off this French supply route and secure it for their future advance.
Deployments
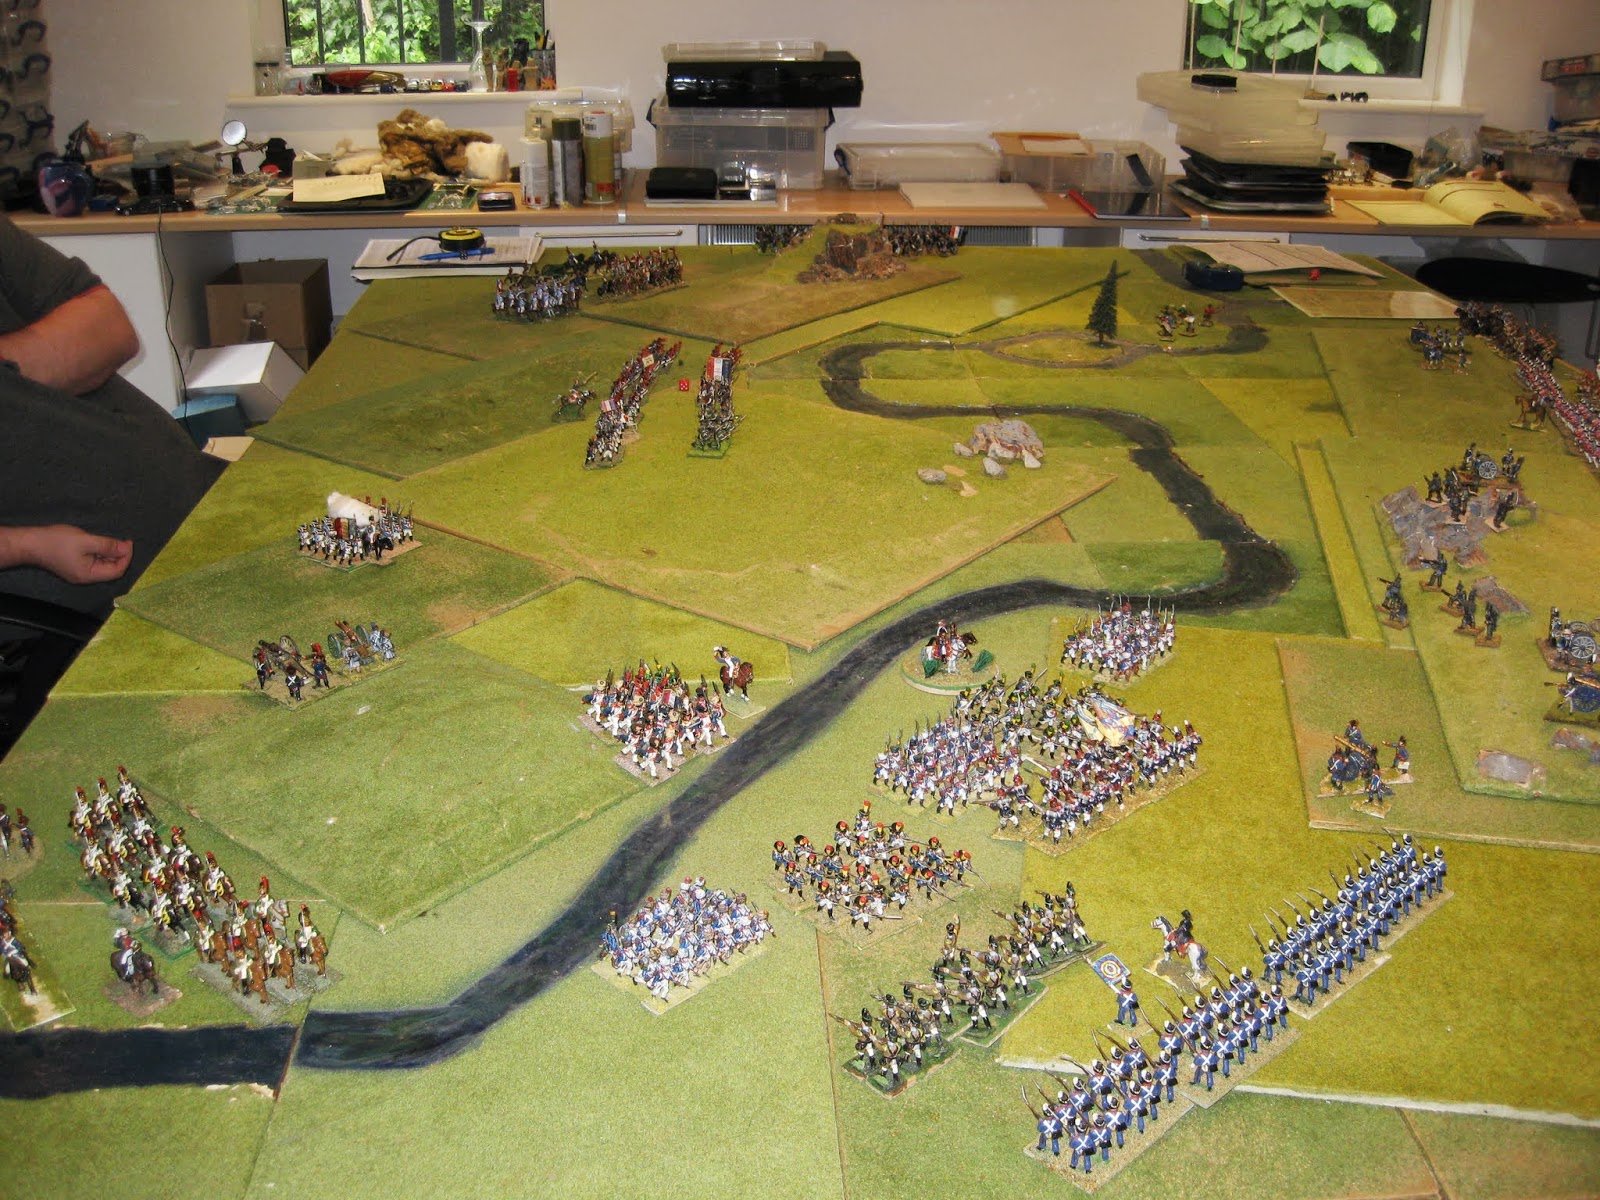
The game was played on a 6ft x 8ft board with a stream running roughly diagonally across it. The tops of the hill and the stream were classed as rough ground as per the Black Powder rules.
The French deployed on the long edge 2ft in from there right flank and 2ft in from there base edge.
The Allies deployed in a defensive position behind the main stream.
Objectives
Break the other side.
Orders of Battle
Note: These units listed are based on what I have available, and where possible I've used the correct unit name rather than a name of a unit definitely in Spain.
The late war organisation and stats were taken from the Black Powder Albion Triumphant Peninsular supplement.
I used the points system in the book. The lists below show the total points selected and the upgrades added.
French 1113 points
Commanders:
General and 6 Generals De Brigade all Staff Rating 8
Characteristics were used, but I don't have copy of what we diced for.
1st Brigade:
1/2nd Leger (light infantry)
2/2nd Leger
1/70th Line battalion (I can't really see the flag number properly, but I can make out a 7)
2/70th Line battalion
3/70th Line battalion
4/70th Line battalion
Corsican Regt battalion
2nd Brigade:
1/4th Line - large (4th because the previous owner had written 4 top left of the flag)
2/4th Line - large
1/55th Line - large ( I painted these, should be made elite but aren't)
3rd Brigade:
Provisional Croatian Regt battalion
1/76th Line battalion
2/76th Line battalion
3/76th Line battalion (the phantom battalion because on reviewing the photos of this game and the last one it isn't there!)
50th Line battalion
Heavy Cavalry Brigade:
Dragoons - small
Dragoons - small
Dragoons - small
Horse artillery battery
Light Cavalry Brigade:
4th Hussars - small
1st Hussars
Polish Lancers
Horse artillery battery
Artillery Brigade
2 Foot battery's
Allies 1113 points
Commanders:
General and 7 Brigadier Generals. Staff Rating for British and Portuguese 8 and Spanish 7.
Characteristics were used, but I don't have copy of what we diced for. The Brits were are medium in decisiveness, independence and aggression. The Spanish cavalry had high aggression which could make it easier to charge.
British 1st Brigade - all veterans
28th North Gloucestershire
50th West Kent - large
79th Cameron Highlanders - large, using line stats not Highland (identification a guess)
95th Rifles company - tiny
Royal Artillery foot battery
British 2nd Brigade
23rd Royal Welsh Fusiliers
88th Connaught Rangers
87th Prince of Wales Own Irish
95th Rifles company - tiny
Royal Artillery foot battery
British Light Cavalry Brigade
12th Prince of Wales's Own Light Dragoons - small
10th Prince of Wales's Own Hussars - small
15th King's Hussars - small
Royal Horse Artillery battery
Spanish Infantry Brigade - points paid to remove wavering and unreliable special rules
Principe Regt battalion
Cantabria Regt battalion
Saboya Regt battalion
Guadalajara Regt battalion - classed as Grenadiers for the game. I think unit has incorrect flags.
Militia battalion
Guerrillas - tiny
Spanish Light Cavalry Brigade
7th La Mancha Lancers - Looking these up for this report I've discovered they fought for Jerome. I've played with these chaps with the 2 previous owners and they've always fought against the French!
Rey Regt - actually a heavy cavalry unit in an 1802 uniform, played as light cavalry
Spanish Artillery Brigade
2 x Foot Artillery with A La Meurte special rule
Guerrillas - tiny
Portuguese Brigade
1/18th 2nd Porto
1/23rd 2nd Almeida
4th Cazadores
Foot Artillery battery
How it played
Turn 1
The Allies won the initiative and pushed out the guerrillas across the bend of the stream to skirmish.
 |
| Allies Centre and Left wing L - R British 2nd Brigade supported by the Spanish infantry, British 1st Brigade, British Cavalry Brigade and forward of the line the Portuguese Brigade. |
 |
| Allies Right wing and Centre L - R Spanish Cavalry Brigade, Spanish Artillery Brigade, British 1st Brigade supported by the Spanish infantry brigade. |
 |
| British line from their right flank |
 |
| British line showing their centre and left flank. |
The French forces were split in to 2 groups, the Left and Right.
 |
| French Left consisted of the 2nd Brigade and the Light Cavalry Brigade |
 |
| French Left |
 |
| French Right L- R 3rd Brigade, Heavy Cavalry Brigade, 1st Brigade |
 |
| French Right |
The Allied artillery opened fire at long range causing casualties amongst the French 3rd Brigade and 2 units of the 1st Brigade the 2/1st Leger and the 1/70th who were also disordered ( I threw a 6 to hit).
 |
| The French Right dice show the number of casualties and the white cotton wool (smoke) the disordered unit. |
 |
| Spanish Guerrillas scramble forward over the stream |
The French began there move with excellent command dice allowing the 1st Brigade to charge the Allied left. The terrain slows the majority who crossed the stream but 2 units make contact with the 1/23rd 2nd Almeida , who being trained by the British have the Steady Line special rule and opt to fire and counter charge. The 2nd Almeida failed to disorder the 2/1st Leger who hit home. We used the French column rule from Albion Triumphant which represented the French not being as well trained which meant the 2/70th did not time it's charge well and did not hit. The rule allowed for the 70th to exploit any win the 1/2nd Leger achieved.
 |
| 1/23rd 2nd Almeida takes on 2 columns |
 |
| View from above. The French right splits in to a 3rd group formed from the 3rd Brigade advancing up the centre. |
 |
| 1/23rd 2nd Almeida, 2/1st Leger and 2/70th get ready to scrap |
 |
| British Cavalry look on as the French contact the Portuguese |
 |
| A company of the 95th Rifles from the British 1st Brigade watches the advancing French 3rd Brigade |
 |
| The French centre and left advance |
 |
| French 3rd Brigade forming the centre |
 |
| Spanish guerrilla watch the French 2nd Brigade appear from behind hill |
Before we worked out the result of the melee with the Portuguese the French commenced shooting. The only eligible units were those from the French 1st Brigade who had crossed the stream and who were not in melee. The result was 1 casualty on the Portuguese artillery and the Cazadores. The Cazadores were also unlucky to be disordered.
Finally we worked through the melee. The result was a draw, but the 1/23rd 2nd Almeida were shaken having taken 3 casualties. This meant the melee continued, but the 2/1st Leger would not be able to use their attack column advantage which represented the power going out of their assault. However we ruled that the 2/70th could next turn join the melee with it's attack column advantage so the French would get there 2 to 1 advantage denied them in the first round of combat.
 |
| The results of the firing and melee. White smoke is disordered, and black shaken. |
 |
| The Portuguese hold! |
Turn 2
The Cazadores were elite which meant they could remove a disorder status on a 4+, which they duly did and opened fire on the 1/1st Leger and caused no casualties. I was very pleased to see that my elite sharpshooters armed with the best rifle couldn't hit a barn door at 20 paces. From a narrative perspective they were accurate but French shrugged off the fire.
The Portuguese, Royal Horse Artillery and the 1st Brigades Royal Artillery all opened fire on the 3/70th and either missed or the French managed to pass their saving throws which meant no casualties. The French had certainly woken up on the right side of the bed that morning and were seemingly unstoppable. The Allied plan began to unravel as it depended on the artillery hurting the advancing French (cut to image of air filled with shot and huge lines of Frenchies being bowled over). The 3/70th then weathered the fire from 2 companies of the 95th Rifles and continued their charmed life.
The 2nd Brigade's artillery and the Spanish cannon managed to shake and disorder the 2/76th line in the French 3rd Brigade in the centre. Honour redeemed! The only issue being the gunners could only see this one battalion in the brigade so they couldn't work their magic on the Croatians next to 2/76th.
 |
| The unhappy 2/76th line |
 |
| At this point I notice that the 3/76th is missing, obviously at the rear guarding the baggage. |
The melee continues with the Portuguese 1/23rd 2nd Almeida, and French 2/1st Leger and 2/70th. This time both French columns count but the 1/23rd 2nd Almeida hold again. I resisted a victory dance.
The French charged their dragoons across the stream forcing the Cazadores in to square and then the 1/18th 2nd Porto. Seeing this the dragoons pulled up allowing the 4/70th and the 1/1st Leger to charge the 4th Cazadores. The 1/1st Leger's command roll resulted in a blunder (a roll of double 6) and they halted just short having drifted too much to the right. After a healthy discussion that stopped the Leger making contact with the Cazadores, but also stopped them moving to the right of the dragoons who could have been blocking their movement, they were positioned touching the 4/70th.
The Cazadores square pored on the fire as the French charged. The pored fire was ignored and the French hit home winning the melee that caused enough casualties to shake the Portuguese riflemen. Holding my breath I rolled for the break test and passed. The Portuguese let out a great shout 'they will not pass!'. Phew, that roll blocked the French advance at least for this round.
 |
| The Cazadores square is to the left with black smoke, and the Almeidas slug it out to the right. |
The Black Powder experts will have noticed that all this brave fighting was in vane. The Portuguese brigade had 4 units that count for breaking purposes and with 2 shaken the brigade will be classed as broken at the beginning of the next Allied turn. The good news is that those units still in combat continue the fight. The unengaged units, though, will have to retire away from the enemy.
The next melee to settle was the Almeida's fending off 2 columns. The Portuguese lost failing their break test and fled but they did manage to shake the Leger.
 |
| The Almeida's shake the Leger but the pressure is to great and they break. |
In the prior shooting phase the French 2/70th formed line and opened fire on the Portuguese artillery who sustained more casualties and broke. A sore loss but one that didn't count towards the brigade breaking.
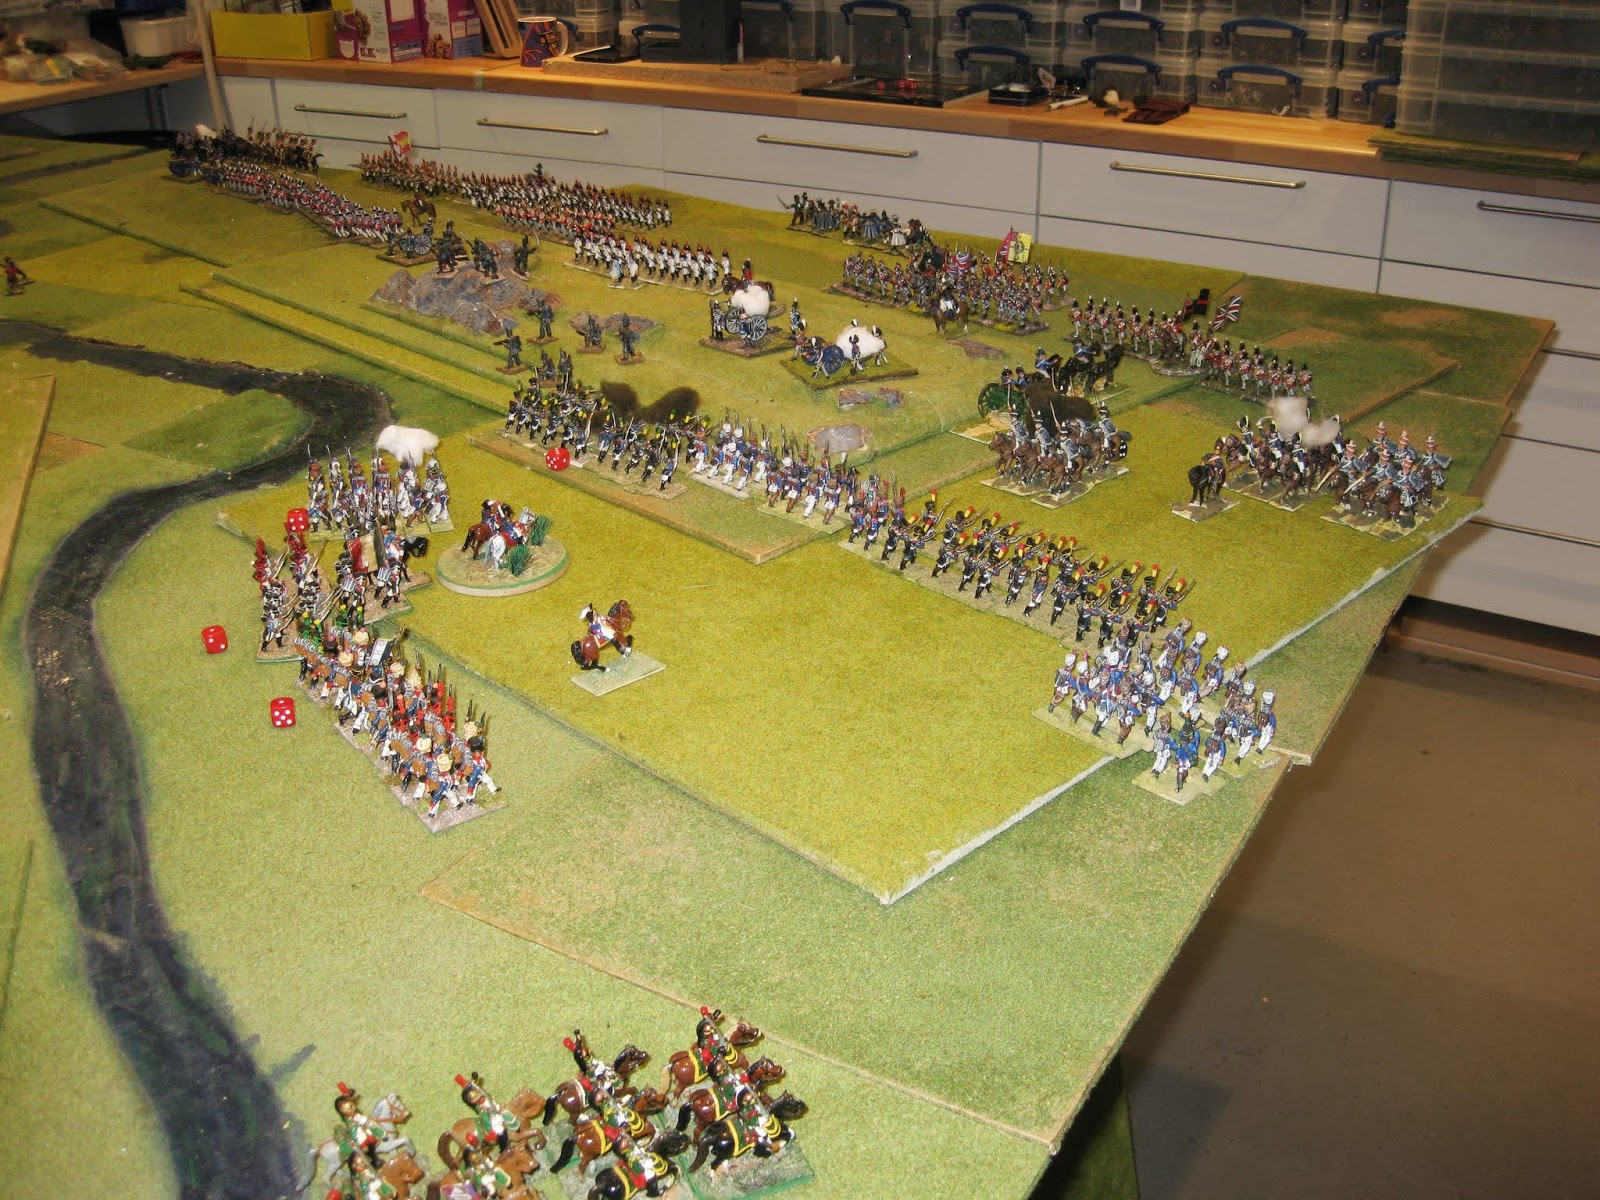
While all this was going on the French left wing advanced past the hill and deployed in line behind the stream threatening the Allied right.
 |
| The French left wing made up of the Light Cavalry brigade and the 2nd Brigade |
 |
| Allied right pondering what to do next. |
 |
| The centre looking strong |
 |
| The left about to see the Portuguese retreat |
 |
| Last look at the gallant Portuguese. The Portuguese Cazadores already in melee effectively form the rearguard for the units seen in line and in square which will begin to retreat next turn which will see them off the board. |
Turn 3
The Portuguese brigade retires leaving the Cazadores to form a rearguard and fight it out.
The British cavalry start the turn wheeling and charging the uncovered French right wing. The 15th Kings Hussars execute their manoeuvre and force the 3/70th in to square in front of the arrayed Allied guns. The Hussars pulled up before hitting the square and returned to their rough start positioned angled to charge again.
The Dragoons received the next order to charge the shaken Leger but the message didn't get through and they and the 10th Hussars stayed put.
 |
| The Allied left - the Principe regiment advance on to the ridge and 2 0'clock from them can be seen the disordered French 3/70th square. |
Now was the time for the British to show themselves on the ridge to begin firing on the French right wing. I now realised the British 1st Brigade was blocked by my artillery. The Spanish however had room to advance. Firstly the British 2nd Brigade managed to advance the 23rd Royal Welsh Fusiliers and the 87th Prince of Wales Own Irish on to the top of their ridge they'd sheltered behind. Then the Spanish Principe regiment moved to the top of the rocky ridge. However the Militia then failed their command role and with the confusion in the Spanish Brigades command everyone else stayed put failing to move and support the British 2nd Brigade.
The Spanish cavalry now needed to position themselves to charge the magnificent French left wing which a part from some artillery fire and sniping from the guerrillas had been left to deploy unmolested. This mistake was then compounded by the Spanish commander misunderstanding his orders and sitting still. Command and control was now a serious problem for the Allies. The general had a word with is dice hand and substituted the failing dice for some shiny new ones.
With the failure of the cavalry on both wings I looked forward to my 2 British guns and light infantry destroying the French 3/70th in square. What can I say about this ... on a positive note they were disordered. The negative was that they were still there and had only 1 casualty not the 3 needed to shake them. My grand plan of artillery and cavalry combined sweeping the French brigades from the field was looking unrealistic.
 |
| The magnificent French left and the mainly stationary British right. |
 |
| At least the British infantry made the ridge. |
The French now had lots of options to exploit the failures of the Allies. Firstly the French left wing 55th Regiment splashed through the stream and clambered over the rough ground to outflank the Allied right. To the joy of the Allies the French Staff Officers now failed and the rest of the French right stood still.
The 55th opened fire and managed to disorder the Spanish Rey dragoons. (I'm narrating out of play sequence here as it is move, fire, melee but I thought it better to describe everything that happened in each zone).
In the centre the French commander tries to rally the shaken 2/76th line but they did not heed his calls.
 |
| Allied right with the French centre top left. |
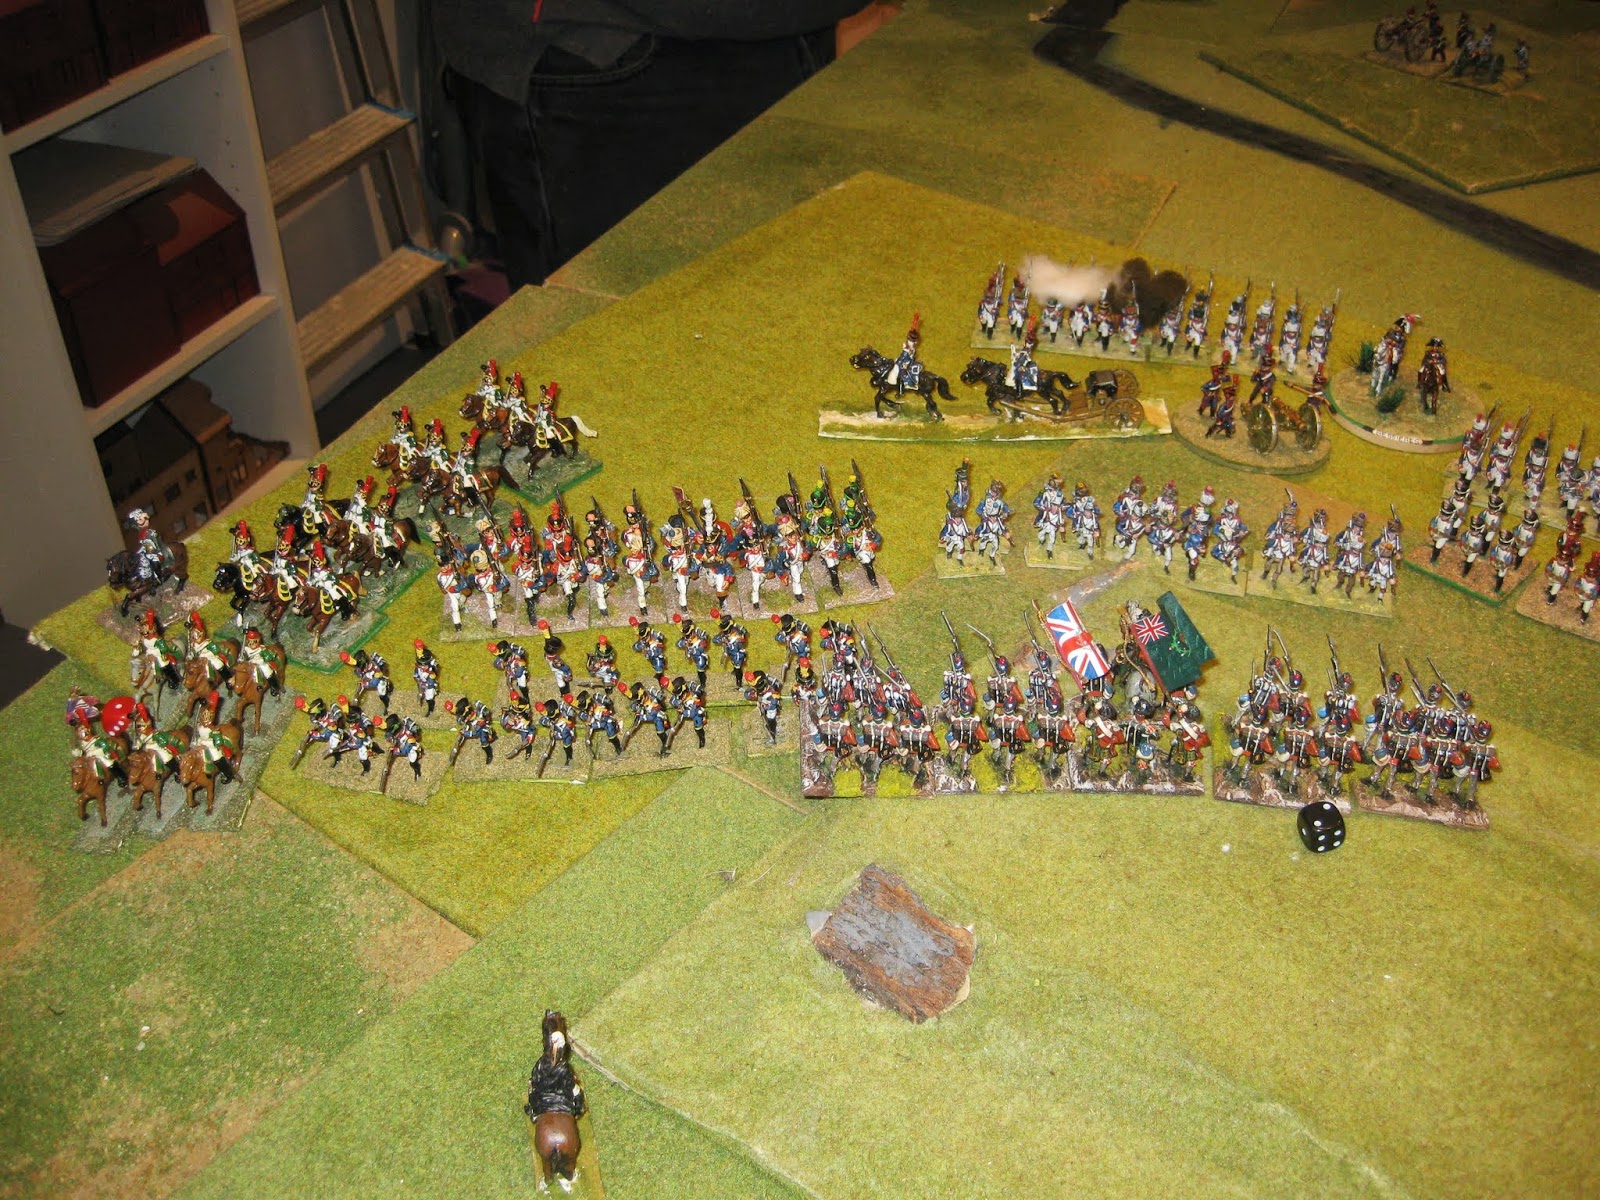
The French 1st Brigade having cleared the Portuguese before them, apart from the Cazadores, and having only received 1 cavalry charge, felt they could advance and deploy in to line. While the 1/1 Leger, 2/70th and 2/1 Leger did this the Coriscans hurried up and crossed the stream and deployed in to line. Dawdling way at the rear the 1/70th were finally found by a staff officer and hurried across the stream keeping their attack column formation to speed them up.
The supporting French Dragoons misheard their order which saw the attached horse artillery gallop off the board, and themselves resting their horses. At this point the French foot artillery finally reached a hill that allowed them to deploy and begin supporting the 1st Brigade.
The new 1st Brigade line opened fire shaking the 15th Hussars and disordered the 12th Prince of Wales's Own Light Dragoons. I'd forgotten how fragile small units were and a crucial save on the 12th Dragoons meant they didn't shake, which with the 15th already shaken would have seen the brigade breaking next turn. The French continued to fire and went on to disorder the Royal Horse and Foot artillery. Ouch.
 |
| The Allied left not looking so good. The French right looking like they mean business. |
 |
| View from the French side and they still look good. The red dice indicating that they are picking up casualties but not enough. The 1st Brigade is large which means I needed to break 4 of its 7 battalions. So far it had broken 4 of mine, which equals 1 brigade and was 1 casualty away from breaking a 2nd. |
 |
| Over view of the French centre and right |
 |
| Over view of the French centre and left |
Turn 4
The British 10th Hussars charge the French 1/1 Leger and forced them in to square. The 10th then returned to their start position. As gentleman wargamers the opposing Generals then had a chat as I decided whether to risk charging my shaken 15th Hussars and force the 2/70th in to square as well. The result of this friendly debate was the realisation that I could save my cavalry brigade if I moved it behind the British 1st Brigade. Since I'd already charged with the 10th Hussars I'd already reduced my chances of survival. Yes, I was already talking about defeat. If I assumed the artillery brigade of the Spanish didn't count then I only had 6 brigades as an army, and the French needed to break 3 to win. I began having dejavu from the last game and the realisation that I hadn't learnt my lesson regarding positioning cavalry. The state of play was 1 Portuguese brigade broken, 1 British cavalry brigade 1 casualty from being broken and a Spanish cavalry brigade currently exposed to enfilading fire. Oops, Wellington will not be impressed.
Stirred in to action I promptly failed to command the 15th to retire behind the British veterans and the Spanish cavalry brigade replied that they'd rather show these Frenchies how to stand and take it. Not good.
In response I moved the British 1st Brigade veterans up to form a new flank. The Spanish Militia and the Principe regiment consolidated there position on the rocky hill ready to fire on the French. The Guadalajara regiment turned to face the French 55th to protect the flank in anticipation of the Spanish cavalry to run after the Portuguese. The remaining Spanish infantry then failed to receive orders. The British 2nd brigade compensated for this and moved the Connaught Rangers up to support the Royal Welsh Fusiliers.
Sensing the urgency the 95th Rifles attached to the 1st Brigade moved forward and enfiladed the shaken 2/1 Leger and routed them. Hooray a small victory. The first French unit to be destroyed out of 2 games.
 |
| The positions before the 95th Rifles fire |
 |
| The 2/1 Leger route and are removed from the board. Huzzah! |
 |
| The Guerrilla and artillery fire disorder the French 2/4th Line |
 |
| The centre. The Royal Artillery cannot score excess casualties on the French centre's shaken unit which would make it break test and possibly route or at least fall back and uncover the unit behind. |
The French right wing advanced further with the horse artillery returning from off board and galloping to the front with the Dragoons supporting the right of the line. The centre stayed still and the left failed all but one command. That successful command saw the horse artillery clatter over the stream behind the 55th line and deploy to enfilade the Rey regiment which had just reordered itself.
 |
| French right |
 |
| French left |
The horse artillery opened fire with predictable results and the Rey regiment gallop to the rear and safety thus the Spanish brigade broke at the beginning of the next Allied turn. That left only 1 more Allied brigade to break and the army would retreat. This fact resulted in a debate about whether artillery brigades count. Normally we'd always added artillery to the brigades thus dissolving an artillery brigade before the game began. Using the army list in Albion Triumphant made me think they could/should be kept together, but having just checked it they are calling then supports or assets so I guess they form part of a brigade in the Peninsular. If the Spanish artillery counts as an army brigade then the French needed to break 4 brigades, if not then they were gunning for 3.
 |
| Rey regiment leaves the Lancers on their own |
So 2 brigades down the shooting moved to the French right wing and all attention was on the British cavalry.
The British cavalry brigade broke, the Dragoons were scattered and the 10th Hussars disordered. Since the 15th Hussars were still shaken half or more units were now shaken meaning they would automatically break at the beginning of the next Allied turn. Technically the French have now won as the artillery brigades don't count to army break points.
The French line continued to fire on the British 1st Brigade's artillery who were shaken and broken by the 3/70th who'd reformed in to line from square. As the horse artillery would retire with the cavalry brigade next turn the Allies were now bereft of artillery on the left flank.
Turn 5
We decided to count the artillery brigades so that meant 1 more Allied brigade needed to be broken to confirm the win. I've already noted that technically the French have now won since I checked the books.
Both cavalry brigades retreated one move which meant off the board they went.
Disregarding the need to retreat the 1st Brigade moves up to punish the French. This unfortunately only partly works as the 50th West Kent fail their command. On the right the Spanish artillery turn to counter the French horse battery. This also only partially worked with 1 foot battery being successful and the other left limbered. I should have kept the now limbered battery facing the French to the front. Oh well.
The 95th and the Principe Regiment managed to disorder the 3/70th and caused them a break test which forced them back. No one else on the Allied left could see the French to shoot at.
The Spanish battery that successfully turned disordered the horse battery and caused a casualty, 1 more and it would be shaken.
Quell surprise the French charged the Spanish limbered battery.
The battery was cut down and the French 1st Hussars charged on in to unlimbered battery and over ran it. They was no closing fire as there was no time for the Spanish to react. Their A La Muerte special rule only counted when being shot at, so no help here.
The 1st Hussars then fell back angled to charge the now exposed flank of the British 2nd Brigade. The much debated Spanish artillery brigade was no more. The French had won in turn 4, and now won again in turn 5.
 |
| Allied right |
Over on the Allied left the French continued to advance and came in to range of the Cameron's and were able to disorder them. The supporting French artillery then caused a casualty on the Principe regiment and through grazing then hit and disordered the Militia behind them.
In the centre the French 2nd Brigade sensing a resounding victory (not hard since they'd 1 once, we revised the criteria and they'd won again) advanced on the rocky hill. The charged 95th company attached to the 1st Brigade evaded and moved towards the Royal Artillery and weathered the French musketry. The 95th Rifles on the rocky knoll are not so lucky and became shaken and disordered.
Turn 6
For glory only the Allies fought on. They'd already lost half the army in turn 4, then we decided that the artillery brigade counted so 1 more brigade would be required to be broken for a French victory which was achieved in turn 5. This turn saw the British veteran 1st Brigade return fire on the French right wing. The 28th North Gloucestershire disordered the lead French Dragoons bottling up the brigade as it edged around the French 1/1 Leger. The Cameron's although disordered managed to disorder the French 2/70th. What the brigade should have been doing was have the 50th West Kent fire on the Dragoons as they would have 4 dice being a large unit which would hopefully shake the French lead Dragoons. Unfortunately the West Kent's failed there command halting the whole Brigade. The 28th North Gloucestershire should have been charging not firing. Oh hum.

The Principe regiment, 95th companies and the remaining Royal Artillery battery fired on the French 2nd Brigade and disordered the Croatians and the 50th.
 |
| The Spanish and 95th unhappy |
 |
| The French 2nd Brigade unhappy, but not close to breaking. |
The Allied firing died down and the French right brought up their remaining infantry battalions to support the line. The rest of the French failed their commands as fatigue settles in. Their firing disordered the Spanish on the rocky hill.
Turn 7
The Gloucester's and Cameron's charged home and the West Kent's finally got in to a position to protect their flank from the French Dragoons. The Gloucester's unfortunately are disordered by the Leger's closing fire but still charged home.
The West Kent's fluffed their firing leaving the French Dragoons ready to charge. The melee was mixed. The Cameron's disordered, and shook their opponents who were pushed back 1 move. The Gloucester's lost and retreated off the table. The West Kent's who were supporting failed their break test and retreated disordered.
 |
| The Cameron's in the thick of it |
 |
| The unhappy West Kent's |
 |
| Definitely more French than British here |
 |
| The French 2/4 Line is 1 casualty from being shaken. The Spanish Guerrillas have done well |
 |
| Final positions. The Spanish had finally moved up to support the British 2nd Brigade and shore up the flank. |
By now it was 6pm and our spouses were calling so we called it a day. Another resounding French victory!
Review
On reflection the Allies lost this game by giving the French all the initiative, plus exposing the weak cavalry brigades too much.
The rules gave a fun game. The Allied special rule of 'steady line' was controversial as it surprised the French. I liked it, but I am biased. Equally the French column rule was not liked by the French, and equally I liked it. The grazing fire rule worked well. I was disappointed with shrapnel, partly as I didn't get the dice needed and if I'd fired ball the dice I did get would have hit. Using commander characteristics spiced the game up and added some extra fun, as did the special rules you find in Black Powder to give your troops a specific historic flavour.
The Black Powder bug is still with us and next time we'll swap sides and I'll be the French. Be assured I'll recall the missing 76th battalion, I'll need them with my success rate.